Monday, March 27, 2023

Maintaining Antique Furniture


QUESTION: I recently inherited a number of pieces of antique furniture from my grandmother. They range from just under 100 years old to around 200. She loved nice things and was always on the lookout for interesting pieces. Unfortunately, as she got older, she was unable to care for them as well as she had in the past. I’m new to antiques and have no idea what to do to care for these pieces. Can you help me?

ANSWER: You’re very lucky that she thought that much of you to leave you her prized pieces. Over time, antique furniture accumulates dirt and grime. Even if she dusted it often, doing so grinds the dirt in, believe it or not. So the first thing you need to do is clean your pieces.

Cleaning is a simple process but you must be careful not to hurt the finishes. One of the best products to use to clean antique furniture is Murphy’s Oil Soap which comes in a concentrated liquid and also in a spray bottle. The best material to use for cleaning is an old washcloth with a bit of nap left on it. If you’re using the concentrate, mix with water following the directions on the bottle. Dip the washcloth in the mixture and get it nice and soaked, then wring it out as much as you can. If you’re using the spray, apply some onto a wet, wrung out washcloth. Clean a small section of a piece at a time, drying immediately with an old towel. You’ll have to rinse the washcloth often as it will pick up a lot of dirt. When you’ve washed the entire piece, let it dry for at least 24 hours. You’ll notice that your pieces are beginning to look a lot better already.

But cleaning is only the beginning. After a piece is thoroughly dry, you’ll need to apply a protective coating. 

The most common finishes found on antique furniture are waxes, oils, shellacs, and varnishes. Not only do these finishes bring out the beauty of the wood's grain and color, but they also protect the wood from moisture and heat changes that can cause shrinking, swelling, crazing, and cracking. Finishes seal the wood pores against dirt and grime, too.

But in order for a finish to protect the wood, the finish itself must be protected. This can be done by polishing the finish with either a wax or an oil.

You can find waxes in liquid, aerosol spray, and paste forms in hardware and home supply stores. Look for products that contain carnauba wax, a natural substance from a palm tree native to Brazil, that’s especially durable and produces a glossy shine when rubbed vigorously. Minwax is one of the best on the market. 

Another reliable and popular polish is beeswax, which has been available for many years. You’ll find a variety of paste and liquid polishes containing beeswax in hardware and home supply stores. 

Apply either type of wax with an old athletic sock. Rub it in thoroughly and wait at least 30 minutes before buffing it with #0000 steel wool. Don’t worry, this grade is as soft as fabric. Wait 24 hours and apply a second coat. But this time, buff it with an old towel.

Oils such as tung, linseed, and lemon oil have been used for centuries to preserve and polish furniture finishes. They're often mixed with absorption promoters, so they actually sink into the wood pores rather than remaining on top as waxes do. Oils leave a lustrous shine that’s softer than a glossy wax shine, and they provide good protection against moisture. However, they tend to darken the wood slightly over time. And as with applying wax, use a piece of old athletic sock to apply the oil. Since you'll need to give your furniture a second coat of oil in most cases, place the cloth you used in a plastic bag and then in the freezer. When you're ready to apply an additional coat, take it out 30 minutes before you plan to begin so that it can thaw.

Regardless of whether you choose to use a wax or oil, always use the same type that has been used previously on a piece of furniture. Finish surfaces that are accustomed to one type of polish won't accept another type. For example, an oil applied to a finish that had been previously waxed will remain on the wood surface and won't soak in.

If you don't know what type of polisher has been used on a piece—apply a small amount of an wax or oil to an inconspicuous spot on the piece. The wood should accept one of them and that is the one you should use.

How often you need to clean and polish your antique furniture will depend on the kind of heating and cooling system in your home, its geographical location, how you use your antique pieces, and the type of cleaner/polisher you're using.

Avoid using spray oils or dusting helpers like Pledge on your antique furniture. The oil in them will only build up on the piece, attracting more dust and grime. Generally, you’ll need to reapply a wax or oil every six months or at least once a year. A light dusting in between applications will keep your pieces looking good.

Besides regular dusting and waxing or oiling, you also need to provide the proper environment, paying close attention to heat, humidity, and light. 

It’s important not to keep your rooms too warm. Extreme fluctuations can harm antique furniture, loosening joints and veneers. During the colder months, depending on your geographical location, keep pieces away from radiators, warm air vents, and fireplaces. Too much heat can rob the wood of vital moisture.

Keeping a relative humidity level at around 55 percent at 65 degrees F. is also important. Purchase one or more inexpensive digital barometers and place them in rooms with your antique furniture. 

Lastly, avoid placing antique furniture, especially older more valuable pieces in direct sunlight or artificial light, especially with today’s LED lightbulbs. Over-exposure to either is harmful.  

To read more articles on antiques, please visit the Antiques Articles section of my Web site.  And to stay up to the minute on antiques and collectibles, please join the over 30,000 readers by following my free online magazine, #TheAntiquesAlmanac. Learn more about "folk art" in the 2023 Winter Edition, online now. And to read daily posts about unique objects from the past and their histories, like the #Antiques and More Collection on Facebook.


Monday, March 20, 2023

The Plastic That Shaped the Future


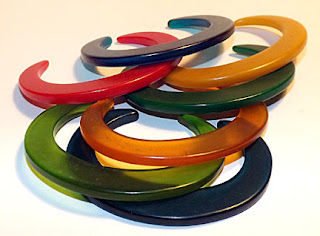
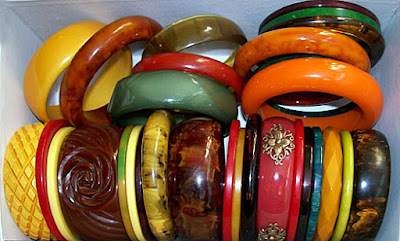
QUESTION: Recently I purchased a box of assorted costume jewelry at a flea market. What intrigued me was the variety of colorful plastic bracelets in the assortment. While these look like they’re made of regular plastic we know today, the dealer told me they were Bakelite. My grandfather once told me that Bakelite was the first plastic. He had an old radio that seemed to have a plastic case. At the time, I didn’t believe it because I thought plastic was a mid-20th century invention. What can you tell me about Bakelite? Who invented it and when?

ANSWER: Without knowing it, you’ve discovered a treasure of the early 20th century. Bakelite was a chemical miracle of the 20th century. It enabled manufacturers to make a variety of items—children’s toys, kitchenware, pipe stems, wall switches, appliance and cutlery handles, colorful radio cases, and yes, jewelry. Dubbed the “Material of a Thousand Uses” by the Bakelite Corporation, Bakelite was versatile and nonflammable.

Leo Baekeland developed this innovative form of plastic in his backyard laboratory in Yonkers, New York, between 1907 and 1909. He attempted to create a synthetic shellac when he discovered that phenol, or carbolic acid, and formaldehyde, when combined under certain conditions, resulted in a molasses-colored resin with unique and exceptional properties.

Once cured, the phenol formaldehyde resin could be ground into powder and mixed with a variety of fillers to create a molding compound that was practically indestructible. Slate dust, asbestos, wood flour and ground walnut shells were all used for this purpose, but because of their dark color, molded Bakelite was limited to shades of black, maroon and brown.

In1911, he founded the General Bakelite Company in Perth Amboy, New Jersey, which produced up to 200,000 tons of the plastic each year. Because it was resistant to heat, moisture, and chemicals, it became a component of the electrical industry. It also had excellent insulating properties, making it perfect for use in electrical insulators, switches, plugs and sockets. 

Making Bakelite was a multi-stage process. It began with the heating of phenol and formaldehyde in the presence of a catalyst such as hydrochloric acid, zinc chloride, or the base ammonia. This created a liquid condensation product, referred to as Bakelite A, which was soluble in alcohol, acetone, or additional phenol. Heated further, the product became partially soluble and could still be softened by heat. Sustained heating resulted in an "insoluble hard gum." 

However, the high temperatures required to create this tended to cause violent foaming of the mixture when performed at standard atmospheric pressure, which resulted in the cooled material being porous and breakable. Baekeland's innovative step was to put his "last condensation product" into an egg-shaped "Bakelizer." By heating it under pressure at around 300° F, he was able to suppress the foaming. The resulting substance was extremely hard and both infusible and insoluble. The range of colors available included black, brown, red, yellow, green, gray, blue, and blends of two or more of these. 

Bakelite came in various forms to suit varying needs, including clear material, for jewelry and smokers' articles, cement, used in sealing electric light bulbs in metal bases, varnishes, for impregnating electric coils, lacquers, for protecting the surface of hardware, and enamels, for giving resistive coating to industrial equipment. In addition, there was laminated Bakelite, used for silent gears and insulation; and molding material, used to form items of utility and beauty.

When Bakelite’s patent on phenol formaldehyde expired in 1927, other companies using the chemical came on the scene, including the American Catalin Corporation which pioneered a purified form of phenolic resin that did away with the dense fillers used in molded Bakelite. The company introduced casting resins in 20 different colors.

The Bakelite Corporation quickly developed its own phenolic resin, producing it in thousands of colors. In reality its recipes were exactly the same as American Catalin, except they experimented more with dye saturation and mixing colorants with clear resin to create mottled and swirled effects.

By the mid 1930s, several competitors had begun producing phenolics which forced the price of both Bakelite and Catalin down. One of these other companies, Fiberloid, introduced Opalon in lapis lazuli, mottled red, alabaster, onyx and mottled walnut, fabricated into board game pieces, jewelry, and umbrella and knife handles.

The introduction of electrical power gave rise to a wide range of labor-saving devices that utilized Bakelite and Catalin in one way or another. The modern appearance, durability and hygienic qualities of plastic made it superior to traditional substances.

Bakelite quickly replaced wood and metal in telephones, clock and barometer cases, as well as knobs and handles on small appliances like electric irons, toasters and cookware. Colorful Catalin cutlery handles and novelty napkin rings dressed up the table and brightened the kitchen.

In 1933 the Bakelite Corporation began to produce wood-tone radio cabinets of compression-molded phenolic resin. Thermosetting plastics resisted the heat generated by radio tubes, making Catalin ideal for radio cabinets. It wasn't long before colorful, modernistic Catalin radios began to make their appearance.

By 1936, various companies made two-thirds of all costume jewelry produced in the U.S. by fabricated molding and fabricating cast phenolic resin. The fabricating process, however, was labor-intensive and lengthy.

First, molds had to be made by dipping a steel master into molten lead. Once workers  assembled enough molds, others prepared phenolic resin and carefully poured it into each mold by hand. A technician carefully combined resins as casting occurred if special swirled or mottled colors were desired, the technician needed to carefully combine resins as they were being cast.

Once filled, workers wheeled the molds into a huge oven to be baked  at176 degrees F. until the resin cured. Curing time varied. Dark red and blue cured in three to four days while whites took six to eight days. Once the cast resin cured, workers removed it from the lead molds using air hammers. This always resulted in damaged molds. Other workers tossed the broken pieces back into the vat of molten lead to be melted down for reuse.

To make jewelry components, workers cut shaped or hollow phenolic rods into individual pieces, much like slicing a loaf of bread. Then they carved and machined by hand them for added adornment. Once they completed the decorative carving, they finished the pieces by tumbling or buffing on a polishing wheel.

Bakelite became a symbol of progress and modernity as the streamlined Art Moderne style overtook the chic style of Art Deco. The sharp-stepped sides of skyscrapers softened into curves, while boxy trains and automobiles became sleek, with fluid lines that created the illusion of speed and motion.

By the late 1930s, plastic moldings reflected the streamline design trends. Shiny surfaces, modernistic curves, waterfall fronts and facades, made to look like car grills, all found their way into jewelry, small home appliances and decorative household objects.

Perfectly suited to Bakelite and Catalin molds, the Art Moderne style enabled the resin to easily flow inside a curved mold. In addition, it was easier to mold, fabricate, and polish the resulting casts than the boxy, stepped sides and sharp corners of Art Deco designs.

Cast phenolic resins weren’t as durable as compression molded phenolic compounds because they shrank over time, often resulting in cracks. Catalin averaged a 4 percent shrinkage in the first 10 years. Cracks developed in radio cases because the parts were bolted to the housing, leading to stress as the plastic shrank.

Though companies produced Catalin in 20 opaque and translucent colors, engineers limited the color range because they felt all other dyes would cause instability in the plastic.

Unfortunately, Catalin reacted to ultraviolet light by converting to phenyl alcohol, which was brownish in color. That was why so many Catalin items are amber colored. The effect turned original white to butterscotch, bright blue into drab olive, green into butterscotch, and brilliant red marble into brown.

To read more articles on antiques, please visit the Antiques Articles section of my Web site.  And to stay up to the minute on antiques and collectibles, please join the over 30,000 readers by following my free online magazine, #TheAntiquesAlmanac. Learn more about "folk art" in the 2023 Winter Edition, online now. And to read daily posts about unique objects from the past and their histories, like the #Antiques and More Collection on Facebook.

Wednesday, March 8, 2023

A Juicy Solution


QUESTION: I was visiting my grandmother the other day and noticed that when she needed some lemon juice for a dish she was preparing, she pulled out a funny looking contraption, placed half a lemon on it, and pushed down on the lemon while turning it slowly. The juice from the lemon flowed into a grove at the bottom. She then poured the juice into her pan and continued cooking. What is this device called and did everyone use them back in the day?

ANSWER: Younger Americans think lemon juice comes from those cute plastic lemons---or from fancy and expensive electric stainless steel appliances that sit on their kitchen counter. Many have never had to squeeze juice by hand, but it wasn't so very long ago when that's exactly what everyone had to do in order to have the lemon juice for a dish or a refreshing glass of OJ. But instead of an electric appliance, people used a reamer.

The French made the earliest reamer, registered in 1767, of nickel silver and porcelain. First produced in Europe, reamers later appeared in the U.S. European reamers were  some of the finest ever created, including those produced by the finest china companies, such as Limoges, Royal Bayreuth, R.S. Prussia, and Meissen.

Though Charles L. Tiffany offered a reamer at his Tiffany and Company store in New York in the early 1880s, the first juice extractor patented in the U.S. was on May 30,1865. This was actually a wooden juice press.

The hand-held lemon squeezer created by George Cornford patented the first hand-held, clear glass lemon squeezer on August 19,1884, and it resembled a darning egg. 

Before the turn of the 20th century, more inventors patented designs for their own juice squeezers. R.E. Bristow of Rockford, IIlinios, registered "The Ideal" on January 31, 1888. John Easley of Manhattan registered a hand-cranked reamer on July 10, 1888, which was the first of his many patents until 1900. In fact, reamer designers of the early to mid 1880s created intricate mechanical designs culminating in the creation of a model that first cut the fruit in half and then extracted the juice.

But these were too sophisticated for the average user. By the late 1880s and early 1890s, designs reverted back to single-piece glass reamers. The registered patent designs of Thomas Curley, whose design was called, what else, the "Curley." Easley came out with a three-piece model, and the Holmes Company gave the world the “Holmes,” which was made of glass. Still the design that finally remained for years to come was Arthur Bennet’s “Lemon Squeezer,” patented on February 16, 1909.

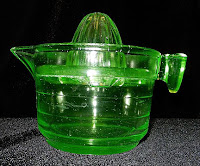
This one brings to mind the classic juice reamer. Made of one piece of glass, the "Lemon Squeezer" had a pointed, grooved center for twisting the fruit on to remove its juice. The juice ran into the shallow dish below the reamer part. The "Lemon Squeezer" also had a handle to 'hold for pouring and a spout.

The first reamers or juicers were for extracting lemon juice for cooking or for flavoring, not necessarily for juicing oranges for making orange juice. Though oranges are available year round now, in 1900 they were exotic and expensive.

But that changed in 1907 when Sunkist, established as the trademark for the California Fruit Grower's oranges, appeared on the market. By 1916, Sunkist began offering glass reamers as a way to promote their oranges. But orange juicers and lemon juicers weren’t the same. Lemon juicers didn’t need a "bowl" or area on the juicer to hold a large amount of juice, but the orange reamers did, which brought about a major change in the style of reamers.

Sunkist was the leader in design changes. Besides offering reamers with "juice receptacles," many of the Sunkist reamers also had embossed lettering, spelling out "Sunkist Oranges and Lemons" or "Sunkist-California Fruit Grower's Exchange.” Sunkist vigorously promoted them through department and variety stores, grocery outlets and by mail-order. Sunkist continued to offer reamers, many made by the McKee Glass Company, until 1961.

By the 1920s and 1930s, reamers became more colorful with the introduction of Depression Glass. In 1922, the Fly Glass Company introduced Pearl Glass, and by 1925 reamers could be purchased in a variety of colors, from Vaseline glass to amber, pink, and emerald green glass. The Great Depression produced more glass reamers  than ever before or after.

There were other produced in the 1930s, including the 'Servitor," the "Handy Andy," and the "Jiffy Juicer."  Though china reamers had been produced in Europe years before, it wasn’t until 1927 when Goebel registered their German ceramics and chinaware in the U.S. Though Goebel didn't begin making ceramic juicers in the U.S. until the late 1920s, ceramic reamers had been produced in America from 1910 and continued through 1938. In fact, by the end of the 1930s, the production of colored glass reamers had declined. 

The end of the reamer era occurred in 1939 as frozen orange juice hit grocer’s freezers.  Today, glass and ceramic reamers are the most popular with collectors.

To read more articles on antiques, please visit the Antiques Articles section of my Web site.  And to stay up to the minute on antiques and collectibles, please join the over 30,000 readers by following my free online magazine, #TheAntiquesAlmanac. Learn more about "folk art" in the 2023 Winter Edition, online now. And to read daily posts about unique objects from the past and their histories, like the #Antiques and More Collection on Facebook.