Monday, August 15, 2011

Preserving Antique Furniture


Some pieces of furniture, especially those constructed of harder woods, such as walnut, mahogany, maple, oak, or cherry, may only need to have their surface finish preserved. In the case of furniture made of these woods, there may be enough of the original finish left to restore the piece rather than refinish it.

Before doing anything, study your piece. Is the finish pretty much intact? Does the piece have a nice patina? Is the piece more than 100 years old? If you answered yes to even one of these questions, then you should do your best to preserve the finish of your piece.

The first step to preservation is cleaning. Furniture gets dirty, even grimy over time. Before you can apply a new finish, you need to get rid of all the accumulated dirt and grease that often make it difficult to tell what kind of wood the piece of furniture is made of. Grime can also hide the fine lines of inlay and marquetry. Believe it or not, using lemon oil, a popular furniture polish, can do more harm than good. Since its made of a light petroleum oil and some paraffin wax, the wood doesn’t absorb it. Instead, it acts as a surface dust catcher.

One of the best products for cleaning wood, especially furniture, is Murphy’s Oil Soap. Today, it’s also in a spray bottle, but in case you can’t find it that way, you can make your own cleaning solution by mixing a capful of Murphy’s in a spray bottle of water. For this, you can use any empty spray cleaner bottle, as long as you wash it out thoroughly first. Since water will loosen any glued joint, and also tends to raise the grain of the wood, you don’t’ want to use very much. An old washcloth will do quite well for cleaning.

Spray the Murphy’s on a damp washcloth and then rub it on the surface of the furniture. Rinse the cloth when it gets to dirty. Have a second wet, but wrung out, washcloth ready to wipe off the Murphy’s Oil solution, wringing the cloth nearly dry after every few wipes. You can also use a green scruby cloth, sold in Dollar Stores, if there’s hard to remove grime. A stiff-bristle brush will allow you to get the dirt out of carved and turned areas. The secret is to clean only a small area at a time–one leg of a chair, one part of a chest, and so on. After you clean an area, wipe it dry with an old face towel. Be sure to wash out all your cloths or use others as you progress, especially on a large piece of furniture. After you have finished cleaning your piece of furniture, give it a final wipe with a clean cotton rag and set it aside to dry for 24 hours.

Now you’re ready to apply a new finish. You can either use plain tung oil (see last week’s blog) or a product like Minwax® Water-Based WoodSheen® which is a water-soluble mixture of furniture finish and stain that comes in six colors. For a piece that’s got lots of scratches or marks, it’s best to choose a stain color that complements the wood’s original finish.

The final step is polishing the entire piece using a prepared wax like Minwax, which comes in light and dark varieties. Obviously, use the light for woods like oak or cherry and the dark for woods like walnut or mahogany. Apply the wax with a piece of soft cotton cloth like an old athletic sock and after 30 minutes, polish the surface with an old face towel. One coat should do it, but for tabletops, apply two coats of wax.

Rub off the first coat with 0000 steel wool, then apply the second and polish with the towel. The more coats of wax you apply, the more water resistant the top will become. A light polishing once or twice a year will keep your piece in great condition.

There are no short cuts or time savers to this entire process. The work can be slow and at times tedious, but the results are worth it.

Monday, August 8, 2011

Basic Refinishing 101


QUESTION: I have a 1930's silky oak drop-door desk that has been in our shed for about 20 years. It has seen a few cyclones and had a lot of weathering and the doors are off and knobs missing. This desk holds special memories for me as a young child watching my dad working at it. I’d like to refinish it but have no idea where to begin. How hard would it be for a beginner like me to refinish it?

ANSWER: Your desk sounds like the ideal piece of furniture on which to learn about refinishing furniture. For many beginners, refinishing seems easy, but it’s far from it. First you need to decide if the piece needs to be completely refinished or the original finish preserved. Your desk seems like it may fall somewhere in between.

It’s only been within the last 20 years or so that refinishing products have appeared that make the job less intimidating. However, most people think you have to strip off all the old finish before applying a new one. That all depends on the condition of the piece.

Your piece appears to have been through some tough times. Before you do anything, you need to evaluate it. Has the finish been mostly removed by weathering or is it spotty? If it’s the former, then you’ll need to sand it following the grain of the wood with fine to medium grade sandpaper. If it’s the latter, you may be able to just clean it up and apply a new coat of varnish. With refinishing, a little effort goes a long way. The nearer you can keep your desk to its original condition, the better.

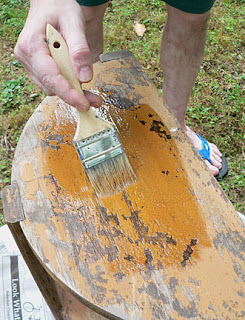
Let’s assume the worst. If the finish has mostly been removed by weathering, you’ll need to remove what remains with a good varnish remover. Be sure to buy one that’s water soluble. Even though this takes longer to achieve the results you want, the fumes are mild and cleanup is easy. When using a remover, always brush it on with the grain of the wood. Do a little section at a time, turning the piece on end if necessary to make it easier to apply the remover. Scrap it off with a putty knife, and be sure to have a roll of paper towels handy to wipe up the excess and stripped varnish or paint.

After you’ve completely stripped your desk of its finish, lightly sand it with fine sandpaper. Wrap the sandpaper around a wooden block for support and sand with the wood grain. Be careful not to over sand---just enough to smooth the surface. After you’re finished sanding, wipe the desk with a damp cloth to remove all the dust. Do not get the wood wet.

Once you have prepared your desk for its new finish, let it rest for a day to make sure the surface is thoroughly dry. Dust it off with a dry cloth to make sure it’s clean, then begin to rub on a new furniture finish of tung or Chinese oil using a piece of white tube sock or other soft cotton material going with the grain of the wood. Several manufacturers make this, including Formbys, and you should be able to buy it at your local hardware or home center. The first coat will soak into the newly stripped wood. Let it dry 24 hours, then sand lightly with fine sandpaper. Dust it with a damp cloth again and let dry. Apply a second coat of the tung oil and repeat the process, except this time rub it with 0000 steel wool after it dries. Dust off again and apply a third and final coat of tung oil, but don’t rub with the steel wool this time.

The advantage to using tung oil is its rapid drying capability. Though it will feel dry to the touch in an hour or so, be sure to let it thoroughly dry for 24 hours. And don’t apply it on a humid or rainy day. And here's a tip: Wrap your application cloth in plastic wrap or put it into a Zip-Loc sandwich bag and place it in your freezer. Take it out 30 minutes before you're ready to apply another coat, and it will be ready for you.

Be sure to tune in next week to learn about preserving the finish of a piece of furniture that isn’t in such bad shape.

Monday, August 1, 2011

Treasure Between the Pages


QUESTION: I was given some old magazines, two of which are dated 1894?  How can I determine if they are of value?

ANSWER: Is it worth keeping old magazines? The answer to that question depends on several things. Just stockpiling old magazines doesn’t result in any significant gain unless you know what you’re doing. Perhaps a family member gave or left you some. Now what?

As with any other type of collectible, condition is critical. However, you could have a back issue that's over 100 years old and pristine but virtually worthless because there's nothing inside or on the cover that a collector would be interested in.

And like other collectibles, an old magazine is only worth as much as someone is willing to pay for it. Perhaps you have some that feature fairly recent notable events, but then you find that they’re only worth a fraction of what you thought. And if no one wants them, they’re worth nothing. Take the Saturday Evening Post, for instance. Most issues from the 1960s forward aren’t worth the paper they’re printed on–one reason the magazine didn’t last. About the only reason anyone collects later issues are for the covers by Norman Rockwell during the 1950s. For modest collectibility, you need to have issues from the 1930s and 1940s. And if you’re lucky enough to have an issue or two in good condition from the 1920s, then you’re talking big bucks.

To know exactly what you have, you’ll have to do some research. Find out what magazines are selling. Check eBay, of course, but don’t forget to check other sources, such as ephemera price guides and other Web sites belonging to dealers and collectors.

So what are collectors looking for in old magazines? The majority look not at the whole issue of a magazine but at certain parts. Some look for vintage magazines with covers by a famous artist. Did you know that Andrew Wyeth painted a Saturday Evening Post cover—and only one at that? Others look for unusual advertisements. They carefully remove the ad and sell it separately, matted and/or framed. A magazine full of unique advertisements could bring in more than issue, itself. A few look for first editions while others look for articles on specific topics.

Like most collectibles, the price of an old magazine is directly related to its age, condition, and the general demand for it. And with demand comes supply. As with newspapers, publishers print magazines in great quantity, especially today. The higher the number printed of a particular issue, the less it’s worth.

By far, the most popular magazine is LIFE. You see them everywhere—at garage sales, on tables at flea markets, and on counters in antique shops. They’re larger than most other magazines and have distinctive covers with the date printed on them in big type. But even famous issues, like the one for the Apollo Moon landing in 1969, only sell for a few dollars. Why? Because they flood the collectible magazine market.

Another topic that you’d think would be highly collectible is the assassination of John F. Kennedy. LIFE, Look, and the Saturday Evening Post all did extensive coverage of the event. Today, you’ll find mint copies of these issues selling for $25 or so at an ephemera show. That’s because T.V. shows on collecting and such have given everyone the impression that these are very valuable. So everyone who has them continues to hold on to them. In this case, it pays to research the event and the market for magazines reported it.

The two hottest collectible types of magazines continue to be those featuring stories, photos, and covers of movie stars and sports personalities. But even these don’t bring much more than $20 an issue—and that’s only if it’s in mint condition.

National Geographic gets the prize for the all-time worst magazine to hold on to. Again, too many people have held onto them which means the market for them is overloaded.

Monday, July 25, 2011

Solving the Ivory Mystery


QUESTION: I have a piece of scrimshaw which has been in my family for years.  I’d like to know how I can determine if it’s authentic or not. On the tooth are two American flags with 23 stars.

ANSWER: Trying to figure out whether a piece of scrimshaw is real or not isn’t that hard. Telling the difference between ivory, bone and plastic requires some close inspection. The high value of scrimshaw due to its rarity and artistic craftsmanship foster fakes.

Ivory, bone, and plastic each have unique characteristics which differentiate them from each other. Using a magnifying glass, look to see if the surface of the piece is smooth or lined. Plastic fakes are usually smooth. True ivory, on the other hand, has either crosshatched or parallel lines, depending on the type. Ivory pieces may also have delicate wavy lines.

How the ivory was originally cut is another indication of its authenticity. In the early 19th century, scrimshanders (those who carved scrimshaw) cross-cut their pieces. Newer ones cut theirs parallel.

The most popular and well-known form of scrimshaw came from whale ivory. Whalemen incised designs into the teeth of whales and often carved other pieces and whalebone into useful objects for their wives and girlfriends. Genuine whale ivory appears whiter and smoother than most other types, though whalemen polished even whale’s teeth since ivory isn’t usually smooth in its natural form.

As the whale trade reached across the Pacific, scrimshanders gained access to elephant ivory, which, unlike whale ivory, has a distinct parallel grain. However, if the lines are perfectly parallel, chances are that its fake ivory, made from ground up bone. Another type they used was walrus ivory which has dark spots on its surface.

Other indications of a piece of scrimshaw’s authenticity are the little mistakes and corrections made by the scrimshander as he handcarved it. Some modern fakers use computers and tattoo needles to create their designs, based on those on old scrimshaw pieces.

Those pieces that appear pitted are usually bone. And while not as valuable as scrimshaw on ivory, the craftsmanship is the same, giving scrimshaw on bone a value of its own.

The oldest test for ivory is to try inserting a pin, heated to red-hot, into someplace on the piece that is out of sight. If the hot pin dents the surface, the piece is plastic. If it smokes, the piece is bone.

Another way to test a piece is to look carefully for a single seam that goes all around the piece, indicating where the two molds containing the plastic piece come together. The surface will also appear much lighter in both weight and color which is consistent all over. Ivory tends to vary in color from both piece to piece and on the same piece. Some people claim that by holding a piece of scrimshaw to a person’s cheek, it will feel cool if ivory and warm if plastic.

To date a piece of scrimshaw look for identifying characteristics, in this case two American flags, each with 23 stars. The 23-star flag was only in use from 1820-1822, thus giving a clue to the date of the piece’s creation.

Read more about collecting scrimshaw.

Monday, July 18, 2011

Boil, Boil, Toil and Trouble


QUESTION: I have  a collection of old medicine bottles, all unopened, from a local pharmacy. Most contain narcotics and have the original corks intact in them.  How should I dispose of the contents, mostly liquid, some pills, how to remove the corks to save them, as well as how to clean the bottles without ruining the labels?

ANSWER: Like witches brew, old medicine bottles can contain some nasty substances. Many are extremely volatile and shouldn’t be mixed with any other substance. But before I get to disposing of the contents, it’s important to know what the laws are governing such them.

Collectors of old medicine bottles do so for the bottles, themselves, if made before 1920. They’re especially interested in the bottle shapes. Those who collect bottles made after 1920 collect them for their contents and their labels. Generally, while collectibles, like cereal boxes, are worth more with their contents unopened, this isn’t so with old medicine bottles.
  
Laws governing the sale of containers with flammable, corrosive or poisonous contents have been on the books since 1908.  Cough syrups and other medicines often contain alcohol, classified as a flammable liquid by the Food and Drug Administration (FDA). The penalties are severe for selling bottles containing dangerous substances, especially in today’s terrorist-prone world.

Nationally, it’s the responsibilities of the Drug Enforcement Agency (DEA) to regulate toxic substances and investigate violations. In 1970, Congress passed the Controlled Substances Act, Title II of the Comprehensive Drug Abuse Prevention and Control Act, which became the legal foundation of the government's fight against the abuse of drugs and other substances.

The law is a bit lax when it comes to poisons, such as strychnine and a deadly product called mercury bi-chloride, formerly used as an anti-syphilitic and to clean wounds. So how do you dispose of nasty substances like this?

While most drugs can be thrown in the household trash, you need to take certain precautions before tossing them out, according to the FDA. The agency used to recommend that people flush some drugs down the toilet, but they no longer do since some of these dangerous substances have been found in the soil and water table. One possibility is to pour kitty litter into a plastic bucket and then pour the bottle contents—cough syrups and other liquids—into it. Let it sit for a while, then scoop up the kitty litter into a double plastic bag and toss it into your trash. Make sure you use enough kitty litter to soak up the contents. Do this outside preferably on the day before your trash will be collected.

You can do the same with pills and capsules, but instead of kitty litter, use coffee grounds. Pour the capsules in a Zip-Loc plastic storage bag containing the coffee grounds and mix the pills into them. Seal and place in your trash.

If you’re not sure how dangerous your bottle’s contents might be, you can look up the medicine in an older edition of the Physician’s Desk Reference or the Merck Manual. However, some of these substances, such as mercury bi-chloride, may no longer be used and, therefore, won’t be listed in any of the reference books. If in doubt, check with a local pharmacist.

The easiest way to clean old medicine bottles after you have disposed of the contents is to rinse them with a solution of warm soapy water. Don’t make the water too warm or the label will come loose. If the bottle has any residue or stains in it, especially those with narrow necks and small openings, you can buy a set of inexpensive fish cleaning brushes from your local pet store. If you can’t find these, check the baby aisle in your local drug store for soft bristle baby bottle brushes.
If the stain persists, pour a 50/50 solution of white vinegar and water and let it set for a few hours, then try brushing the inside of the bottle again.

Unfortunately, the corks on old medicine bottles will have absorbed some of the solution and are just as dangerous as the bottle’s original contents, so throw them out. You can reuse those on bottles containing pills.

Tuesday, July 12, 2011

Figural Cookie Jars Hold Delicious Delights


QUESTION: I have a Goldilocks cookie jar...it was my mother-in-law’s mother’s, bought a long long time ago. On the bottom it has “Patent Pending” and the number 405.  Can you give me any information on this cookie jar?

ANSWER: The Regal Pottery Company, later known as Regal China, produced your beloved Goldilocks cookie jar in the 1940s. The jar stands a foot tall and is nine inches wide, and, yes, has “Goldilocks Pat Pend #405" stamped into the clay on its base.

Established in 1938, the company, located in Antioch, Illinois, remained in business for more then 50 years and became known for its high quality non-porous china and for the rich colored glazes that they used, especially on the fine cookie jars they made. Even earlier pieces of Regal china seldom have any crazing in the glaze. Besides the Goldilocks jar and lots of others, Regal also made the Quaker Oats cookie jar. Rumor had it that they made the original jar as a premium for the employees of the Quaker Oats Company. On the back of this cookie jar is the famous Quaker Oats Oatmeal Cookie Recipe. Unfortunately, the decline of the decanter business–Regal China also produced liquor decanters—forced the company to close in June of 1992.

Cookie jars don't have to be old to have substantial value since collectors determine a jar’s value  by design, rarity and condition more than its age. Though the British used covered jars of cut glass and silver made especially to hold shortbread biscuits during the 19th Century, thus the name “biscuit jar,” it was the American pottery jar that first caught the eye of collectors.

The first American cookie jars, either glass or pottery, gained popularity at the start of the Great Depression in 1929. Shaped like covered glass cylinders or pots with screw-on lids, these early cookie containers were more utilitarian than decorative although they were often painted with floral or leaf decorations.
                                      
The Brush Pottery Company of Zanesville, Ohio, produced the first ceramic cookie jar, in green and with "Cookies" painted on the front. The company marked their jars with “Brush USA.”
By the mid-1930s, stoneware became the predominant material for American cookie jars.

As the end of the 1930s decade dawned, most manufacturers followed the move to molded pottery, and designers became more innovative as they began to produce cookie jars in figural shapes resembling fruits, vegetables, animals, and other whimsical characters such as Goldilocks.

The golden age of American cookie jars got underway in 1940 and lasted until 1970, with several manufacturers rising to prominence, including the Red Wing, McCoy, Brush,. Hull, Regal China, Metlox, Shawnee, and Robinson-Ransbottom companies. Many of these companies located in the clay-rich Ohio River Valley. By the mid-1940s, cartoons and comics inspired many makers to reproduce the popular characters of the day–Superman, Winnie the Pooh, Dumbo, Mickey Mouse, and Woody Woodpecker, to name a few.

Collectors love McCoy cookie jars. The company, based in Roseville, Ohio, produced cookie jars from about 1939 until 1987. Their first jar–the “Mammy” cookie jar–is today one of the most valuable.

American Bisque of Williamstown, West Virginia is recognized as another top U. S. manufacturer, beginning in the mid-1930s. They’re particularly well known for the cartoon characters which they translated into cookie jars, and they marked them “U.S.A.” on the bottom.

Other well respected U.S. manufacturers are known for particular cookie jars or series, such as Metlox of California, maker of the highly sought after Little Red Riding Hood jar, and the Abingdon Pottery of Illinois, maker of the Mother Goose jar series.

Today, with the advent of Zip-Loc packaging and plastic, air-tight containers, the cookie jar, for the most part, has gone the way of the horse and buggy and the Ford Edzel. But the nostalgia lives in on the cookie jar collections of hundreds of admirers who long for those good old days and the delicious homemade cookies found inside these jars.